Installing Audio Orchestrator on Windows
To use Audio Orchestrator on a Windows computer, follow the instructions below.
Info
Audio Orchestrator requires at least Windows 7 and a 64-bit system.
Warning
Windows support in Audio Orchestrator is still experimental. We recommend backing up your project files before moving them between systems.
Install Audio Orchestrator
-
Run
BBC R&D Audio Orchestrator Setup.exeand follow the instructions. -
If you already have ffmpeg and ffprobe installed, that's it—you're ready to go. If not, read on for instructions on installing these.
You can open Audio Orchestrator using the shortcuts in the Start menu and on your Desktop.
Install ffmpeg and ffprobe
To use Audio Orchestrator, you need to have an installation of ffmpeg and ffprobe version 4.1.0 or later. If you're not sure whether you have these, just try opening Audio Orchestrator. You'll see an error message if you don't have the required software installed.
- Download the ffmpeg distribution.
- Go to https://ffmpeg.org/download.html and click the Windows logo in the "Get packages & executable files" section.
- You'll find multiple options for downloading Windows EXE Files. On the linked sites, look for a download named
release-essentials-ziporffmpeg-{version}-win64-{version}.zipand download the .ZIP file. - In the popup, choose Open with Windows Explorer.
Info
It's easy to end up with a latest or master or git development build of ffmpeg, and this won't work with Audio Orchestrator. Always look for one that says release or includes a two-part version number like 4.1 in the file name.
- Move the downloaded files to the right location.
- Open a second Windows Explorer window
- In the address bar, enter the path
%userprofile%and press Enter to open your user's home directory. Alternatively, you can browse toC:\Users\<your name>(it's the folder that contains Desktop, Documents, Downloads, etc.). If Windows can't find the%userprofile%path, try replacing it with%HOME%throughout these instructions. - Create a new folder in your home directory and name it
audio-orchestrator-ffmpeg - Move the contents of the ffmpeg directory from the downloaded .ZIP file into
audio-orchestrator-ffmpeg(there may be several files and a folder calledbin). - You should now have
ffmpeg.exeandffprobe.exein the folder%userprofile%\audio-orchestrator-ffmpeg\bin. If your ffmpeg download only contained the.exefiles, you may have to create thebin\folder yourself.
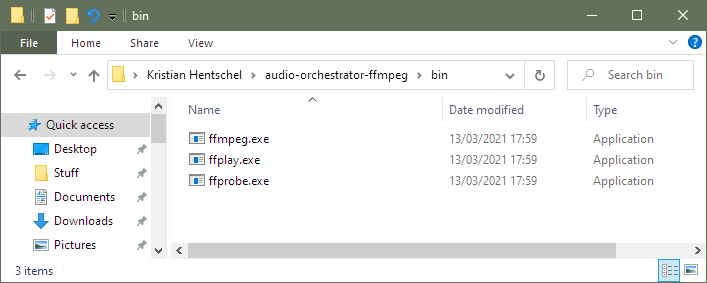 ffmpeg and ffprobe executables with the required folder structure
Tip
You can check that ffmpeg is installed correctly by opening a command prompt (Windows + R, enter cmd); and running the command %userprofile%\audio-orchestrator-ffmpeg\bin\ffmpeg. This should print the version information, starting with either ffmpeg version 4.4 or ffmpeg version n4.4. Some available builds do not have a version in this format, and are not supported by Audio Orchestrator.
A previous version of Audio Orchestrator did not recognise ffmpeg versions with the n prefix. Please make sure you are using the latest version.